dBASE onLine Training
The Hands-on Project
Michael Nuwer
November 11, 2002
 |
dBASE onLine Training
|
|
DataModules |
For the Hands-on Project we will need a few datamodules. But before we proceed with building these datamodules, let's review a few important points from the Tutorial.
As you proceed to build the datamodules, remember (1) each datamodule should be subclassed from the base datamodule; (2) be sure to set the rowset autoEdit property to false for each of the rowsets in all of the datamodules; and (3) be sure to set the "rowset" property for each datamodule. This is the property that will determine which rowset is controlling the relationships.
We need a custom datamodule that includes a database object pointing to the Pets database. We do not, however, need to recreate base.cdm (the base custom datamodule) from scratch. Rather copy base.cdm that was created for the Tutorial Project to the \Pets folder. After coping the file, open it in Source Code Editor and change the database name from "dBASETutorial" to "Pets."
This new version of Base.cdm now contains a database object pointing to the Pets database and a method for creating calculated fields.
Customer And Pets
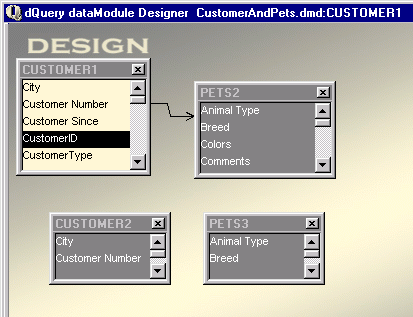
The first datamodule will create a relationship between customers and their pets and will be used with one of the data enter forms. A customer can own one or more pets, so we need to create a one-to-many relationship between the Customers1 query object and the Pets2 query object. Figure 3.1 is a depiction of this datamodule.

The datamodule is inherited form Base.cdm. The Pets2 query object uses the index named "customerID" and is linked to the Customer1 query object by the customerID field. A parent-child relation should thereby be set between Customer1 and Pets2.
In addition to the Customer1 and Pets2 query objects, there is a second instances of the Customer table named Customer2 and a second instance of the Pets table named Pets3. These two query objects are going to be used for lookups and are not linked in any parent-child relation.
After you add the Customer2 and Pets3 query objects, select the Customer1 query and create a canSave event handler. Let's consider what we need to do. First, we need to construct a Customer Number when a new customer is added to the system. We are going to do this in the Customer1 object's canSave event. When the user click a save button, our code will take the first two characters of the customer's last name and add a sequence number. In order to know the sequence number we will do a lookup into the second instance of the Customer query (Customer2). If a match is found, we will use the next number, otherwise we will use the first sequence number. The following code is used for this task:
   function rowset_canSave
      local cValue, nValue, dm
      // if a row is being appended
      // Find a unique Customer Number
      if this.state == 3 // append
         dm = this.parent.parent
         cValue = upper( left(this.fields['name'].value,2) )
         dm.customer2.rowset.indexName := "CustNumberLookup"
         if dm.customer2.rowset.findkey(cValue)
            nValue = val(substr(dm.customer2.rowset;
			        .fields['Customer Number'].value,3,3))
            nValue ++
            cValue += str(nValue,3,0,"0")
         else
            cValue += "001"
         endif
         this.fields['customer number'].value = cValue
      endif
      return true
We need to something similar for the Pets table. Pets will be added to the system in the Pets3 query object. When the pet is added, we need to lookup the customer and located the sequence number for the new pet. Add a canSave event handler to the Pets3 query object. The code for that event follows:
   function rowset_canSave1
      local cValue, nValue, dm
      // if a row is being appended
      // Find a unique Customer Number
      if this.state == 3 // append
         dm = this.parent.parent
         nCustomerID = this.fields["CustomerID"].value
         dm.customer1.rowset.indexName = "CustomerID"
         // setRange on the current customer. This will
         // set a filter on the child records to those
         // matching the customer
         dm.customer1.rowset.setRange( nCustomerID )
         cValue = trim(dm.customer1.rowset.fields['Customer Number'].value) + "-"
         // if there is a child record, find the next
         // sequence number. Otherwise use "01"
         if not dm.pets2.rowset.endofSet
            dm.pets2.rowset.last()
            nValue = val(substr(dm.pets2.rowset.fields['Pet Number'].value,7,2))
            nValue ++
            cValue += str(nValue,2,0,"0")
         else
            cValue += "01"
         endif
         this.fields['Pet Number'].value = cValue
      endif
      return true
We will revisit this code when we create the forms for editing customer and pet information.
LookupSQL
You should also add a lookupSQL to the Pets3 query object. Locate the "Animal Type" field in the Inspector and add the following SQL select statement:
select * from animals
This element will be used in a combobox controls on the form that edits pet information.
Add a CalcField
The next element that needs to be added in this datamodule is a calculated field for displaying the type of customer. We will use this field in a read-only context and therefore a lookupSQL is not necessary. The rowset will contain one field that contains the customer type code and the calculated field will contain the description.
Add the calculated field to the Customer1 query's onOpen event handler. We will use the calcField method contained in the base datamodule.
 function customer1_onOpen
   class::calcField("CustomerType",10)
   return
Before we can add the actual calculation, we must save and reload the datamodule. To do this, (1) click File|Save (name the datamodule "CustomerAndPets.dmd"); (2) click File|New|Datamodule; then (3) click File|Open and select the CustomerAndPets.dmd datamodule. The calculated field should then be initialized and a beforeGetValue event handler can be added.
Add the beforeGetValue event handler for the CustomerType field and enter the following code:
function customerType_BEFOREGETVALUE
   local cType
   cType = ""
   do case
   case this.parent['type of customer'].value == '1'
      cType = "Individual"
   case this.parent['type of customer'].value == '2'
      cType = "Pet Store"
   case this.parent['type of customer'].value == '3'
      cType = "Zoo"
   endcase
   return cType
This code will "morph" the customer type code value into the customer type description.
This concludes the elements needed for the first datamodule.
Visits
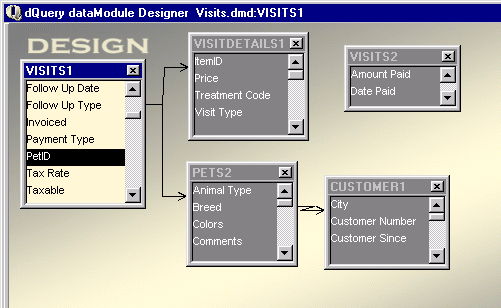
The next datamodule is going to be used in two forms and one report. The forms are used to edit information about visits and their details. See Figure 3.2 to see the structure of this datamodule. The primary (or controlling) query is Visits1. It maintains a one-to-many relationship with VisitDetails1. The forms that will use this datamodule is used for entering visits and their details.
In these forms the Pet and Customer data is need as reference information. So Pets2 is a one-to-one relation with Visits1 and Customer1 is a one-to-one relation with Pets2. Thus, for each visit in Visits1, we can find the pet in Pets2 and the pet's owner in Customer1.

The datamodule is inherited form Base.cdm. The child query (VisitDetails1) uses the index named "visitID" and the link field to Visits1 is visitID.
VisitDetails1 also contains a lookupSQL. The field "Treatment Code" has a lookupSQL property that selects data from the treatment table:
select * from treatments order by treatment
In this datamodule the Pets2 and Customer1 queries are used as lookup tables. For a given Visit, we want to know the pet's name and the customer's name. We could do this with a lookupRowset, but in this case it would get a bit complicated. So we will instead set a one-to-one relationship.
In the Pets2 query use "PetID" as the indexName and set a relation from Visits1 into Pets2 using PetID as the link field.
Next select "CustomerID" as the indexName in the customer1 query and set a relation from Pets2 into Customer1 using CustomerID as the link field.
You can use the dQuery live data window to see how these relationships work. Select the Visits1 query object and then click on one of the rows in the Data grid. For the selected Visit, you can select the VisitsDetails1 object and see multiple items. Then click the Pets2 query. Only one Animal will be displayed. Likewise, for the Customer1 query.
Adding Visit Numbers
This datamodule contains a second instance of the Visits table, which is used to lookup Visit Numbers. When a new visit is added to the system, we will create a Visit Number from the Year, the Julian day, and a sequence number. We did something similar in the CustomerAndPets.dmd datamodule. Here we will add a canSave event handler to the Visits1 query object. When the event fires, we will lookup the Visit Number in the Visits2 query and increment the sequence number if necessary.
Create the canSave event handler (for Visits2) and add the following code:
   function rowset_canSave
      // if a row is being appended
      // Find a unique Visit Number
      if this.state == 3 // append
         local dJan, dDate, dFDoY, DoY
         local cValue, nValue, dm
         // Find the day of the year.
         // Code addapted form dateex.cc from
         // dUFLP. Programmers Kenneth Chan,
         // and Jay Parsons
         dDate = this.fields['Visit Date'].value
         dJan = dDate - day( dDate ) + 1 - 28 * ( month( dDate ) - 1)
         dFDoY = dJan - day( dJan ) + 1
         DoY = dDate - dFDoY + 1
         ///////////////////////////////////////////////////////////

         // constuct string for Year+DayOfYear
         cValue = str(year(dDate),4) + str(DoY,3,0,"0")
         dm = this.parent.parent
         dm.visits2.rowset.indexName = "VisitNumberLookup"
         // look for visit number in a copy of the
         // visits table.
         if dm.visits2.rowset.findkey(cValue)
            nValue = val( right( dm.visits2.rowset.fields['Visit Number'].value,2) )
            nValue ++
            cValue += "-" + str(nValue,2,0,"0")
         else
            cValue += "-01"
         endif
         this.fields['Visit Number'].value = cValue
      endif
      return true
This code is much like the code used in the first datamodule.
Pet Select
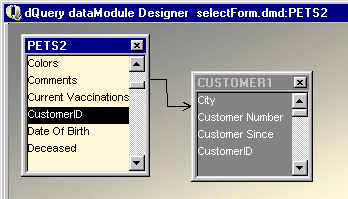
The third and final datamodule will create query objects for the Customer and the Pets tables. Unlike the CustomerAndPets.dmd datamodule, however, this one will reverse the relationship--that is, Pets2 is going to be the master rowset and Customer1 is going to be the child.
One reason we are creating this datamodule is so you can see how the behavior of a rowset is based on the relationship between query objects. In the CustomerAndPets datamodule, a customer can own several pets, which is called a one-to-many relationship. So the Customer1 query object is set as the parent query, and the Pets2 query object is restricted to pets owned by the customer.
In the current datamodule, each pet is associated with one and only one customer. This is a one-to-one relationship. The Pets2 query object is the parent query and the customer1 query displays a single customer.
The ability to use reverse relationships make dBASE unlike most other database systems. In dBASE either query object in a linked relationship can be the parent. The datamodule shown in Figure 3.3 is an example of this flexibility.

This datamodule is inherited form Base.cdm. The child query (Customer1) uses the index named "customerID." The link field is customerID.
Conclusion
The datamodules that we have just completed are going to be used with the forms (and in one case a report) in our Pet Clinic application. But before we can create the forms, we must create the custom controls that will be used on the forms.
The Legal Stuff: This document is part of the dBASE onLine Training Program created by Michael J. Nuwer. This material is copyright © 2001-2002, by Michael J. Nuwer. dBASE, dBASE Plus, dBASE SE and dB2K are copyrighted, trademarked, etc., by dBASE, Inc., the BDE (Borland Database Engine) and BDE Administrator are copyrighted, trademarked and all that by Borland Software. This document may not be posted elsewhere without the explicit permission of the author, who retains all rights to the document.