|
The dBASE Plus Web Wizards |
After completing Session One you will have a web server installed on you computer and it will be configured to run dBASE Plus CGI applications. In this Session you will work with the dBASE Plus Web Wizards. One reason to work with the Wizards is to become familiar with the features that they provide. Another reason is that the resulting program files can be explored.
Part 4 of dBASE on The Web by A.A. Katz discusses each of the Web Wizards and it would be a good idea to read through this pages.
In addition, there are a series of documents at the dBASE web site that explain how to use each of the Wizards. The following link will take you to those documents [dBASE.com.]
Finally, John Staub wrote an article for the dBulletin, "Visual dBASE 7.5 Query/Response Wizard," which explores the query and response Wizard and discusses a number of useful extensions.
The exercises and examples in this Tutorial will use a sample database that is very similar to the database used for the dBASE Tutorial. This data was included in the compressed archive filed that you downloaded in Session One. The tables were copied to the DATA folder in your document root. You will need to create a BDE alias called "WebTutorial" that points to these table. The Web Wizard exercises use this alias.
If you have the dUFLP installed, you can use BDEAlias.cc with the following commands. Otherwise you can use the BDE Administrator to create the Alias.
   set procedure to :duflp:bdeAlias.cc additive
   b = new BDEAlias()
   b.CreateAlias( "WebTutorial", "C:\Apache2\htdocs\data" )
| A note about table locations |
|
This Tutorial stores the table in a subfolder of the web server's document root. The folder structure looks similar to this: c:\Apache2\htdocs ................HTML c:\Apache2\htdocs\data ...........Tables c:\Apache2\htdocs\signup .........Example Application The data is thereby inside "web space." It is not a good idea to put your data within the web space on a production site because your tables will be exposed to downloads by anyone on the Internet. If, for example, someone types http://server.domain.edu/data/customers.dbf, that file will be downloaded to the web client's computer. For security reasons, you may want to place your database folder outside web space. Perhaps something like this: c:\Apache2\htdocs ................HTML c:\Apache2\htdocs\signup .........Example Application c:\Apache2\data ..................Tables A dBASE Plus CGI applet can access any of the resources on the computer so long as the web server has appropriate permissions. An internet client, however, has access only to resources which are within the server's web space. Unfortunately, some ISP may not provide storage space outside the server's web space. If that is the case be sure there is some kind of security that will prevent a web user from "hijacking" your data. One of the advantages of using a BDE alias in your web applications is that it is easy to locate your data in one place on the development machine and in another place on the production machine. |
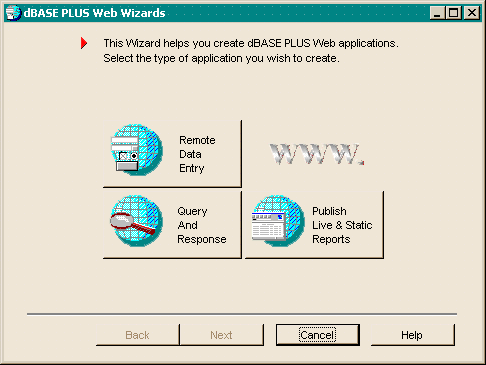
With dBASE Plus the Web Wizards are accessible from the File menu. There are three types of web applications that the Wizards produce:

In this exercise we will work with the Remote Data Entry Wizard. Detailed Instructions for using this wizard are available in dBASE on the Web, pp. 63-64 and at dBASE.com.
We will use the WebTutorial database to create this applet. In order to use this Wizard you first need to create a data module. For this Exercise create a simple DMD. Use WebTutorial for the database and Customers.dbf for the query. Or use my copy of this datamodule which is in the "Source" folder of the document root. Much like the Attendees example found in the instructions, we will be adding new customers to the customers table. Complete each of the steps in the Wizard.
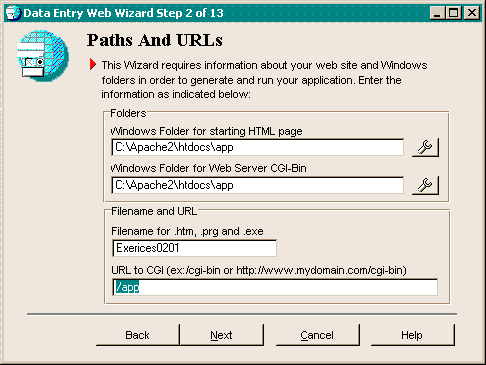
In Step two the information to enter will look similar to the following image. The applets of this Tutorial will be run form the APP folder.

In Step 3 the datamodule is located in the following path:
C:\Apache2\htdocs\Source\Exercise0201.DMD
You are on your own with the rest of the pages in this wizard. Select whatever options you would like for formatting this page. On page 13 the application will be created. Five files will be copied to the APP folder.
You should then be able to test the application. Use your web browser to call the html form (http://localhost/app/Exerices0201.htm). Enter data and submit the form. Verify that the data is in the Customers table.
For the second exercise we will build a live report using the Publish Live Report wizard. With this Wizard you must begin by creating a new report. Use the WebTutorial database and use the Supplier and Inventory tables. You can create a datamodule and drop it onto the report or you can drop the tables directly onto the report. Set a master-detail relationship by assigning the following properties to the inventory1 rowset:
   indexName = "SupplierID"
   masterRowset = form.supplier1.rowset
   masterFields = "SupplierID"
Finally add some fields to the report. For example, add Company from the Supplier1 query and Description from the Inventory1 query. Test and Save the report. When the report is running as you want, close the designer.
My copy of this report is Exercise0202.rep in the C:\Apache2\htdocs\Source\ folder.
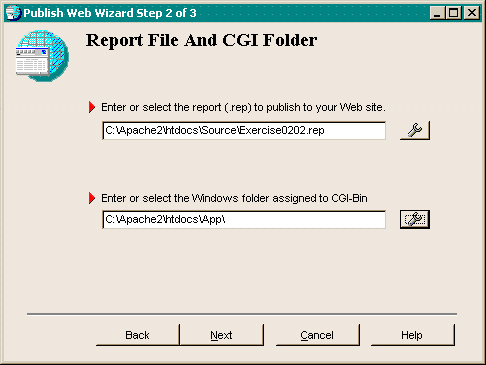
Next run the WebWizards and create a Live Report based on the report file you just saved (or use my report file). If you need a step-by-step guide, follow this link to "Publish A Live Report Wizard" or refer to pages 67-68 in "dBASE on the Web." In step two of the wizard you need to select the report file and the "CGI-Bin" folder. The following figure shows the setting that I used for this Exercise.

After the applet is created, you can run it from your web browser with the following URL:
http://localhost/App/Exercise0202.exe
When a dBASE report is outputted to HTML, the dBASE converter uses a HTML table to format the page. So you can make it easier to convert the report by following a few simple rules.
It's important to align the text object so that they line up in symmetrical rows and columns (the columns are generally the tricking part). I use the align tools to do this. For example Header 1 and Field1 are Left Aligned and they have the same width! (use the "grow to largest width" button for this). Also the their header objects are aligned top to form a row (so are the field objects which a second row). The Title text object width spans the full width of the streamframe. To do this, select the streamframe and the text object, then choose "grow to largest width" and "Align Left".
The third Exercise will create a Query and Response applet using the dBASE Plus Web Wizards. This Wizard lets the user enter a search parameter and produces a filtered report. In this Exercise we will create an applet where the user will lookup customer by state.
Begin by creating a report. Use the customer table and add a few fields to the detailed band. The report I created is named Exercise0203.rep and is stored in the "Source" folder.
Before you can run the Query and Response wizard there is an important change that must be made to the report. Open the report file in the dBASE Plus text editor and locate the following line (it should be near the top of the file):
sql = "select * from customer.dbf"
You must change this line so that it looks like this:
sql = "select * from customer.dbf where stateID='"+cSearch+"'"
The Query and Response application will receive a search parameter from the remote web user, store this value into a public variable, and call the report. When the report is rendered, it "sees" the public variable and uses it to filter the selected data. The problem with this approach is that the next time you open the report in the report designer, it will modify the sql line. In that case, be sure that you change this line back so that it works correctly.
Now you can run the Web Wizard. In Step Two you will need to change the file name to "Exerices0203.rep." Then complete the rest of the steps. A step-by-step explanation is available at this link. In addition to that document, there is a useful paper in the dBulletin that deals with the Query and Response Web Wizard, "Visual dBASE 7.5 Query/Response Wizard" by John Staub. This paper discusses the usage of the Query and Response Web Wizard and it provided examples of how to customize a query and response applet. This paper is a must read for anyone interested in using the Query and Response Wizard.
Web applications and desktop applications have quite different ways of connecting to data. Data is never live in a web application and, for this reason, a grid is of no use. Because web applications do not maintain live connections to the data tables, inline editing is of no use and data lookups are problematic.
The web equivalent of a grid is a report with hyperlinks. The ability to add hyperlinks to a report makes a web report more interactive than a desktop report. Herein lies the notion of the "drill-down" report.
In Exercise 2.4 we will use the dBASE Plus Web Wizards to create a drill-down report. This application will need two reports files. The first is a list that might simulate a lookup. The report that we will use is a supplier list. The user can choose one of the suppliers from the list and a second report will be generated which displays detailed inventory information from this supplier.
To create the first report add the supplier table to the report and, in the databand, add the company name and the supplierID. The second report should be created using the Inventory table, and a few fields should be added to the detail band. The reports I created for this Exercise are named Exercise0204a.rep and Exercise0204b.rep.
The second report works much like the query and response report so you need to edit it in the text editor before running the Web Wizards. The sql property of the inventory1 query should look like this:
sql = "select * from inventory.dbf where supplierid='"+cSearch+"'"
Now you can run the Web Wizards. Select the Query and Response Wizard. In Step Three be sure to choose the "Drill-down" radiobutton. In Step Four choose Exercise0204a.rep for the report and then, in step 5 choose Exercise0204b.rep for the report and choose SupplierID for the link field.
The Wizard creates an HTML form in which the user can enter a search parameter. This parameter will filter the first report. Alternatively, the user can call up the first report without a filter. Use the following URL to run this applet:
http://localhost/App/Exercise0204a.exe
Then choose one of the four suppliers to call up the inventory report.
| Note |
| The hyperlink used in this exercise utilizes the so-called "GET
action" to run the CGI application. The data entry form, on the other
hand, utilizes the "POST action." When a URL is used to invoke
a CGI program, the "query string" which contains the arguments
is included in the URL. A query string consists of a question mark, followed
by the name/value pairs to be submitted to the program. Each name/value
pair is separated by an ampersand (&). You must use the URL-encoded
values when you construct such a hyperlink. We will discuss the details
of this in a later Session.
|
The final Exercise of this Session is a variation of the drill down report. We are going to create our own hyperlinks rather then leaving that job for the Wizard. We begin by creating a new report. Again use the WebTutorial database. We will add the Customer and Invoice tables to this report. Set a master-detail relationship by assigning the following properties to the Invoice1 rowset:
   indexName = "CUSTOMERID"
   masterRowset = form.customer1.rowset
   masterFields = "CustomerID"
In this report we also need to create a calculated field. To do this, add an onOpen event for the Invoice1 query and enter the following code:
   local f
   f = new Field()
   f.fieldName = "AnchorTag"
   f.length = 60
   // Beware of line wrap.
   f.beforeGetValue = {|| [<A HREF="OrderItems.exe?search=] ;
       + ltrim( str(this.parent["InvoiceID"].value )) + [">GO</A>] }
   this.rowset.fields.add(f)
The new field will include an anchor tag (i.e. a hyper-link) which will be displayed with each customer invoice. When the report is rendered, the text for the URL will look something like this:
OrderItems.exe?search=26
The number 26 is the InvoiceID for the row represented in the report. This hyper-link will be used to call another CGI program and to pass a variable. (Note that we have not created OrderItem.exe at this point.)
You can now layout the report. I used "LastName" and "FirstName" from the Customers1 query and "OrderDate" and "AnchorTag" (the calculated field) from the Invoice1 query.
Run the WebWizards and create another Live Report based on this report file. The following URL can be used to run the program:
http://localhost/app/Exercise0205.exe
The Legal Stuff: This document is part of the dBASE onLine Training Program created by Michael J. Nuwer. This material is copyright © 2001, 2003 by Michael J. Nuwer. dBASE is copyrighted, trademarked, etc., by dBASE, Inc. This document may not be posted elsewhere without the explicit permission of the author, who retains all rights to the document.