
dBASE onLine Training
The Hands-on Project
Michael Nuwer
November 30, 2002
|
dBASE onLine Training
|
|
Create the Menu |
The Hands-on application is going to need a menu much like the Tutorial application. However, the menu will be a bit more extensive than the one used in the Tutorial. Figure 7.1 shows each of the items that will be added to the Pets application menu. The items in the File menu are much the same as they are in the Tutorial menu, except, we have moved the open-form items to their own drop down menu. The Reports, Window, and Help menus are also the same in both applications. The new items in Hands-on Project are the "Edit" and the "Data" menus.
| File | Edit | Data | Forms | Reports | Window | Help |
| Close Form | Undo | Next Row | Customers | Customers | Close All | About |
| Close All | Cut | Prev Row | Visit Entry | Pet Listing | ||
| Exit | Copy | Last Row | Pet Information | |||
| Paste | First Row | Pet Invoice | ||||
| Daily Visits |
You can begin this menu by entering the main items along the top of the menu bar. Be sure to name each object as it is created.
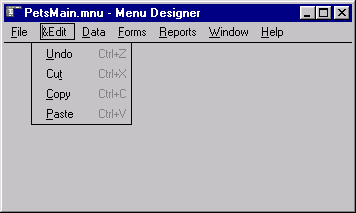
The "Window" and the "Edit" menus are inserted automatically by dBASE Plus. After you type, and rename, the "File" item in the first column, tab to the right. Then on the dBASE Plus menu select Menu|Insert "Edit" Menu (see Figure 7.2). Do the same for the "Window" menu after the "Reports" item.
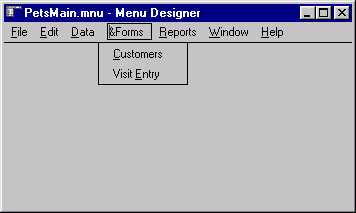
Next we will work with the menu used for opening our forms. There are two forms that we need to place in the menu: the Customer and Pets form and the Visit Entry form. These can be opened the same way you open forms in the Tutorial menu. You will need the OpenForm method from the Tutorial menu and you will need to add onClick methods for the two form items shown in Figure 7.3.
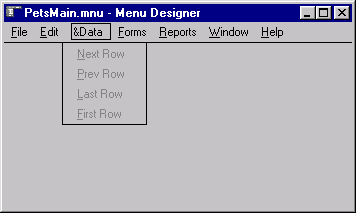
The next menu item that we will discuss is new in the Hands-on Project. The Data menu is shown in Figure 7.4. It is used to navigate the rowset of the current form. The "Next Row" and "Prev Row" items do the same thing as the next and previous buttons in the Data Form's MyToolBar control. The "Last Row" item moves the row cursor to the end of the rowset and the "First Row" item move the row cursor to the beginning of the rowset.
Below are the four methods used in this menu. Each of these work with the default or controlling rowset of a form. But, unlike the toolbar buttons, the menu object is not contained in the form. Therefore we must use different dot notation to reference the rowset.
You might recall that when a data form gets focus, it assigns itself to the "currentForm" property of the application window. All the data forms in the application issue the following statement when they receive focus:
_app.framewin.currentform = this
This property is the conduit through which the menu has access to the form.
   function NEXT_onClick
      if ( not _app.framewin.currentForm.rowset.next() )
         _app.framewin.currentForm.rowset.next(-1)
         msgbox("At end of rowset", "Can't Navigate", 64)
      endif
      return

   function PREV_onClick
      if ( not _app.framewin.currentForm.rowset.next(-1) )
         _app.framewin.currentForm.rowset.next()
         msgbox("At beginning of rowset", "Can't Navigate",64)
      endif
      return

   function LAST_onClick
      _app.framewin.currentForm.rowset.last()
      return

   function FIRST_onClick
      _app.framewin.currentForm.rowset.first()
      return
The next thing we need to do is enable and disable these menu items based on whether a data form is active or not. In the menu designer disable all four menu items. ("enabled" is a property of the menu item and we are setting it to false.) The disabled items will be grayed in the menu.
Our Data menu will open along with the application in this state. Then when a data form is opened and gets focus, we will enable the menu items. When the form loses focus we will disable the items. This is done in the Data forms, so you should enter the code below in the DataForm.cfm custom form. That form is inheriting a "form_onGotFocus" method and a "form_onLostFocus" method from the base form, so we will override the parent methods, but we will still call the parent code from in the new method.
   function form_onGotFocus
      local isMenu
      baseCform::form_onGotFocus()
      isMenu = findInstance("PetsMainMenu")
      if not empty(isMenu)
         _app.framewin.root.DATA.first.enabled = true
         _app.framewin.root.DATA.next.enabled = true
         _app.framewin.root.DATA.prev.enabled = true
         _app.framewin.root.DATA.last.enabled = true
      endif

      return

   function form_onLostFocus
      local isMenu
      baseCform::form_onLostFocus()
      isMenu = findInstance("PetsMainMenu")
      if not empty(isMenu)
         _app.framewin.root.DATA.first.enabled = false
         _app.framewin.root.DATA.next.enabled = false
         _app.framewin.root.DATA.prev.enabled = false
         _app.framewin.root.DATA.last.enabled = false
      endif

      return
The "isMenu" variable is used to test whether the form is being opened in design mode (were the "PetsMainMenu" will not exit) or in runtime mode (were "PetsMainMenu" will be the root menu).
      isMenu = findInstance("PetsMainMenu")
      if not empty(isMenu)
         ...
      endif
Consider the lines that enable and disable the menu items. "_app.framewin" is the application window. In the next Session of this course we will create a start program and attach our menu to the application window. The object name of the menu is going to be "root". So from within the data form's focus events, "_app.framewin.root" is a reference or pointer to the menu. "Data" is the name I used for the Data menu in my sample code; and finally, "first", next", "prev", and "last" are the menu items we are enabling or disabling.
It has taken me a good deal of time to understand how a menu works, so if this all seems a bit fuzzy, don't despair. Keep thinking about it and it will come with time.
The distribution file for this Hands-on Project included three reports for use in the application. The first report is PetStatus.rep. It is a listing of Pets and shows the reader whether the pet is Deceased, Neutered or Spayed, and is Currently Vaccinated. The report draws its data from a single query selected from the Pets table. The report is similar to the Supplier Information report in the Tutorial Project.
The second report is Customer.rep. This report prints a list of Customers and their pets. It is grouped by Customer and prints pet name, type of animal, breed, and gender of each pet. The report is designed very much like the Inventory Summary report in the Tutorial Project.
We are going to open these reports with a simple report view form. You should find RepView.rep and RepView.mnu in the project's working folder. This form is taken from the dBASE Plus Samples with a few modifications for this project. The form is less complex than the Preview.wfm form that is used in the Tutorial application. It provides us an opportunity to how the basic viewer form functions work. It will also provide an introduction of how to pass paramaters to a report. And since the form has its own menu, we well see how a dBASE application handles alternating menus bars based on the current form.
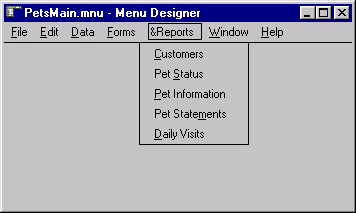
To attach the first two reports to the application's menu, enter the following code in the onClick method for the "Customers" and "Pet Status" menu items. We will open the RepView.wfm form with a parameter for the specific report to render.
Notice that these reports are not using the Preview.wfm form. This is so that you can learn another way to print reports.)
   function REP_CUSTOMER_onClick
      local f
      set procedure to RepView.wfm additive
      f = new RepViewForm()
      f.RepView.fileName := "Customer.rep"
      f.open()
      return

   function REP_STATUS_onClick
      local f
      set procedure to RepView.wfm additive
      f = new RepViewForm()
      f.RepView.fileName := "PetStatus.rep"
      f.open()
      return
The next report in the menu is the Pet Information Report that was created in Session 6. The PetsReport.wfm form renders that report, so the menu must open this form. We have already done something similar in the Tutorial Project when we worked on the Account Statements report. Although the dialog was different in the Tutorial, the procedure used to open the dialog form is the same.
   function REP_PETINFO_onClick
      local f
      set procedure to PetsReport.wfm additive
      f = new PetsReportForm()
      f.mdi = false
      f.readModal()
      close procedure PetsReport.wfm
      return
Recall that this report is rendered to the dBASE Plus built-in report view. We are not using the RepView form because normally this report is rendered directly to the printer.
The last two reports are going to use a few new ideas. The first report is the Account Statements Report. This report is included in the Hands-on Project distribution archive and you should find it in the main application folder. The second report is the Daily Visits Summary report that you created in Session 6.
We are going to run both of these reports from a dialog form. In fact, we are going to run them from the same dialog form. Both reports are going to use a start date and end date parameter, so we can use the getDates.wfm form from the Tutorial project.
The following code is going to be used for the onClick methods associated with the "Pet Statement" and "Daily Visit" menu items. You can add this now to your PetsMain menu.
   function REP_STATEMENTS_onClick
      local f
      set procedure to getdates.wfm additive
      f = new getdatesForm()
      f.reportToPrint = "statements"
      f.mdi = false
      f.readModal()
      close procedure getdates.wfm
      return

   function REP_DAILY_onClick
      local f
      set procedure to getdates.wfm additive
      f = new getdatesForm()
      f.reportToPrint = 'daily'
      f.mdi = false
      f.readModal()
      close procedure getdates.wfm
      return
Notice that both methods call the GetDates.wfm form and that a custom form property named "reportToPrint" is given a value. We will use this property to print the correct report from within the getDates.wfm form.
Now we need to edit the getDates.wfm form. You should locate that file in \dBASETutorial and copy it to \Pets.
Use the Source Editor to change the class declaration line so that it used the custom dialog form in the pets folder and change the "set procedure" statements so that it uses MyControlsPets.cc. (See the sample source code if you are not sure how these lines should look.)
Next we need to add two onClick methods to the form. But unlike most of the onClick methods that we have already created, these two methods will not be tied (or linked) to an event. Rather, they will be added to the form as freestanding methods.
The following two methods should be added:
   function YesButton_ForDaily
      local cStart, cEnd, f
      dStart = (form.SpinboxStart.value)
      dEnd = (form.SpinboxStop.value)
      set procedure to RepView.wfm additive
      f = new RepViewForm()
      f.RepView.params[ "dStart" ] = dStart
      f.RepView.params[ "dEnd" ] = dEnd
      f.RepView.fileName := "DailyVisits.rep"
      f.open()
      form.close()
      return

   function YesButton_ForStatements
      local cStart, cEnd, f
      cStart = dtoc(form.SpinboxStart.value - 1)
      cEnd = dtoc(form.SpinboxStop.value + 1)
      cFilter = [:visit date: > '] + cStart ;
            + [' and  :visit date: < '] + cEnd + [']

      set procedure to RepView.wfm additive
      f = new RepViewForm()
      f.RepView.params[ "filter" ] = cFilter
      f.RepView.fileName := "petStatements.rep"
      f.open()
      form.close()
      return
The way we are going to make all this work correctly is in the form's onOpen method. Let's review the steps. A user will click a menu item to run a report. The onClick method for that menu item will create a new instance of the getDates.wfm form and set a custom property that identifies the report they wish to print.
When the form opens, we will use that custom property and link one of the two onClick methods to the "OK" pushbutton (i.e. the YesButton). The following is the code for the form's onOpen method:
   function form_onOpen
      form.SpinboxStart.value  = ctod('01/14/2000')
      form.SpinboxStop.value   = ctod('01/14/2000')

      // Link a method to the yesbutton's
      // onClick event.
      do case
      case form.reportToPrint == "statements"

         form.yesbutton.onClick = ;
            form.yesButton_ForStatements

      case form.reportToPrint == "daily"

         form.yesbutton.onClick = ;
            form.yesButton_ForDaily

      endcase
      return
This is another example of dBASE's power and flexibility. Elsewhere we have seen how custom properties can be created and changed in an application. Now we see that custom methods can also be modified on the fly. In the above case we are able to control the behavior of a pushbutton's onClick event by assigning one or another method.
It is common for reporting systems to give users the ability to select parameters that customize a report. These often include values that are used to filter and/or sort the data. In our two reports, we need to filter the data based on a user-selected date range.
The standard method of "passing" parameters to a report object is to use the ReportViewer's "params" property. This property is an associative array; it gets loaded in the form when the report viewer is opened (we've already set these values in the "yesButton" code) and it is used in the report. What we need to do now is add some code to the reports and use the parameters.
One way to do this is to read the parameters and set the filters in the report's bootstrap code. We will consider PetStatements.rep first. Open this report in the Source Code Editor. At the very top, (that is, at line one in the file) insert the following code:
if argcount() > 0
   local cFilter, r
   // Bug workarund.  This next line should not
   // be needed but...
   set procedure to petStatements.rep additive
   r = new PetStatementsReport()
   cFilter = r.ReportViewer.params[ "filter" ]
   r.streamsource1.rowset.filter := cFilter
   r.render()
   return
endif
This code will execute if there is a parameters array when the reports is opened. When the OK button on the GetDates form is pushed, a "filter" element is added to the params array. A reference to this array is created when the reportViewer opens the report.
Therefore, if a parameter is passed, the report’s StreamSource object’s rowset’s filter property is set so that only the specified dates are shown in the report. The report is rendered, and the "return" statement prevents the execution of the standard bootstrap code.
We need to do something very similar for the DailyVisits.rep report. Open this file with the Source Code Editor and add the following bootstrap code.
if argcount() > 0
   local dStart, dEnd, r
   // Bug workarund.  This next line should not
   // be needed but...
   set procedure to DailyVisits.rep additive
   r = new DailyVisitsReport()
   dStart = r.ReportViewer.params[ "dStart" ]
   dEnd   = r.ReportViewer.params[ "dEnd" ]
   r.streamsource1.rowset.indexname := 'Visit Date'
   r.streamsource1.rowset.setRange(dStart,dEnd)
   r.render()
   return
endif
The main difference in this code is that the rowset's setRange() method is used instead of the rowset's filter property. Otherwise, we are doing the same thing as we did in the PetStatement report. If a parameter is passed, the report.streamsource1.rowset's setRange method is set so that only the specified dates are shown in the report.
We cannot test this menu until after we create a start program. That is the subject of the next part of the Tutorial.
The Legal Stuff: This document is part of the dBASE onLine Training Program created by Michael J. Nuwer. This material is copyright © 2001-2002, by Michael J. Nuwer. dBASE, dBASE Plus, dBASE SE and dB2K are copyrighted, trademarked, etc., by dBASE, Inc., the BDE (Borland Database Engine) and BDE Administrator are copyrighted, trademarked and all that by Borland Software. This document may not be posted elsewhere without the explicit permission of the author, who retains all rights to the document.