
dBASE onLine Training
The Hands-on Project
Michael Nuwer
November 11, 2002
 |
dBASE onLine Training
|
|
Creating Forms |
In this part of the Hands-on project we are going to build the forms for the Pet Clinic application. Following the pattern of the Tutorial Project, we will use three custom forms:
We can use Base.cfm and DialogForm.cfm from the Tutorial Project with only a few small modifications, while a new version of dataForm.cfm will be created. You should copy Base.cfm and DialogForm.cfm from the Tutorial folder to the Pets folder.
We will begin by making some modifications to Base.cfm. Open the Pets copy of that custom form with the Source Code Editor.
You should see two lines like the following:
class baseCForm of FORM custom
   set procedure to MyControls.cc additive
Replace "MyControls.cc" with "MyControlsPets.cc". This way the custom controls will be taken for our updated CC file.
Second we will change the icon file used for the application. The Hands-on Project includes an icon file named "Database.ico" which you can use for the forms. Find the form's icon property in base.cfm:
icon = "filename Mugs.ico"
and edit it like this:
icon = "filename database.ico"
Finally we will remove the Title object. While in the Source Code Editor, you can delete the object and all of its properties by deleting the following lines. (You can also open the form in the designer and visually delete the object.)
   this.MYTITLETEXT1 = new MYTITLETEXT(this)
   with (this.MYTITLETEXT1)
      height = 1.5
      left = 0
      top = 0
      width = 47
      text = "<h2>Base Form</h2>"
   endwith
In this application, a title will be used only on the dialog forms (not on the data forms). Therefore the base form should not have the title object. Save and close the base custom form.
Next we will modify the custom dialog form. Open the Pets copy of DialogForm.cfm and find the following two lines:
   class DialogFormCForm of BASECFORM custom from "Base.cfm"
      set procedure to MyControls.cc additive
Again you need to replace "MyControls.cc" with "MyControlsPets.cc".
Next remove any reference to the title object that is inherited from the base custom form. Since we removed the title object from the base form, dBASE will through an error in the dialog form because the object doesn't exist. Look for the following lines and delete them:
   with (this.MYTITLETEXT1)
      text = "DialogForm"
   endwith
You can save and close this file. Then open the DialogForm.cfm in the designer and add a MyTitleText object at the top of this form. Add something like "Dialog Form" as the "text" property and set the Anchor property to "top," which will automatically resize the title when the form is resized.
You can save and close this file.
We will now work with the custom Data Form. In the Hands-on Project we are going to use a different layout for our data forms, so lets build this one from scratch.
Figure 5.1 shows the custom DataForm that we will create in this Project.
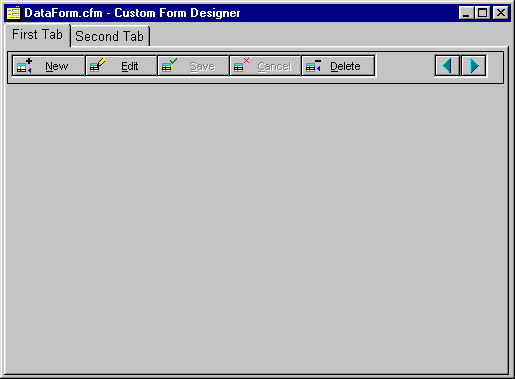

It differs from the Tutorial's DataForm in that a notebook object is used in place of the tabbox object. By adding a notebook you will get some practice working with this control. You will need to remember that the notebook is a container and most of the form controls will be inside that container.
When you create this form, be sure it is derived from (i.e. subclassed from) Base.cfm. Then add the controls; first the Notebook, then the toolbar, grid, seeker and textlabel. Also remember to clear the custom form class when you are finished.
In addition to the toolbar, seeker and grid controls that must be placed on this form, there are two methods that we need to add.
The onOpen method is first. This is the same code as we used in the Tutorial. However, we do not need to set the autoEdit property because it should be set in each of the datamodules.
   function form_onOpen
      if form.rowset # null
         // assign this method to the rowset's canNavigate:
         form.rowset.canNavigate := class::rowset_canNavigate
         form.rowset.first()
      endif
      return
Next we need to add the "rowset_canNavigate" method that we used in the Tutorial project. This method is used without modification.
   function rowset_canNavigate
      /*
          Check to save any changes before allowing navigation.
          For whatever reason, this gets called twice. If the
          user chooses Yes to Save, or No to abandon, then
          the next time through the rowset.modified property is
          false so there's no problem. If the user chooses to
          cancel the navigation, they'll get prompted twice.
          For that reason, we set a flag to indicate it's been
          here once. If the flag exists, we null it, if not we
          run the validation.

          Code by Gary White
      */

      local bYes, nAnswer
      if type("_app.cancelNav") == "L" and _app.cancelNav
         _app.cancelNav := null
         bYes = false
      else
         bYes = true
         if this.modified
            nAnswer = msgbox("Save changes before leaving record?", ;
			                 "Data has changed",32+3)
            do case
               case nAnswer == 6 // Yes
                  this.save()
               case nAnswer == 7 // No
                  this.abandon()
               otherwise         // Cancel
                  bYes := false
                  _app.cancelNav = true
            endcase
         endif
      endif
   return bYes
Save the form as DataForm.cfm, and then close the designer.
The Pet Clinic application contains two data forms. The first one is "Customers and Pets." This form is used for adding and editing customer information and pet information. We will also need to create a dialog form for adding and editing pet information.
The data form will be derived from the custom DataForm and will use the CustomerAndPets datamodule that we created in Session 3. You can do these two tasks now.
Next, begin adding the visual controls. Figure 5.2 shows the form's first page. It displays information specific to the customer and is taken from the customer1 query.
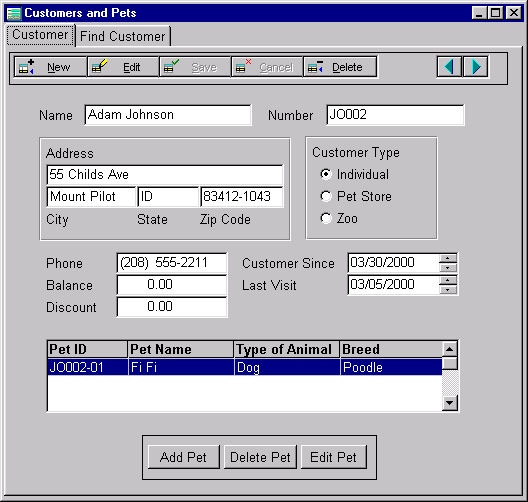
| Label Text | Control Class | Field/other |
| Name | MyEntryField | name |
| Number | MyEntryField | customer number |
| Address | MyEntryField | street |
| City | MyEntryField | city |
| State | MyEntryField | state |
| Zip Code | MyEntryField | zip code
picture = "99999-9999" function = "R" |
| Phone | MyEntryField | phone
picture = "(999) 999-9999" function = "R" |
| Balance | MyEntryField | outstanding balance |
| customer since | MyEntryField | customer since |
| Customer Since | MySpinBox | customer since |
| Last Visit | MySpinBox | last visit date |
| Individual | MyRadioButton | type of customer |
| Pet Store | MyRadioButton | type of customer |
| Zoo | MyRadioButton | type of customer |
| Note: Remember that the "text" property of a radiobutton is the value that is stored in the table. In our data these values "1", "2", or "3". On the form we overlaid textLables so that the user sees "Individual", "Pet Store", "Zoo" rather then the numbers. | ||
The grid below these controls contains information related to the pets. Since a customer can have more than one pet, we used a grid to displays all the pets related to the current customer. Editing is not allowed in this grid. As we have done in the Tutorial Project, adding and editing pet information is handled with a dialog form. (See Figure 5.5 below.)
The grid is datalinked to the Pets2 query object and the three databuttons underneath act on that query object.
The "Add Pet" and "Edit Pet" buttons need code that opens the Pets.wfm dialog form (which is explained below) in either an edit or an append mode. The code is very similar to the code used in the Tutorial Project's Invoice.wfm form.
   function PBADD_onClick
      local f
      set procedure to pets.wfm additive
      f = new petsForm()
      f.CustomerID = form.rowset.fields['CustomerID'].value
      f.mdi = false
      f.mode = "Append"
      f.readModal()

      close procedure pets.wfm
      form.customerandpetsdatamodule1.pets2.rowset.last()
      form.customerandpetsdatamodule1.pets2.rowset.refreshControls()

      return

   function PBEDIT_onClick

      if not form.customerandpetsdatamodule1.pets2.rowset.endOfSet
         local f
         set procedure to pets.wfm  additive
         f = new petsForm()
         f.PetID = form.customerandpetsdatamodule1.pets2.;
		                 rowset.fields['PetID'].value
         f.mdi = false
         f.mode = 'Edit'
         f.readModal()
         close procedure pets.wfm
         form.customerandpetsdatamodule1.pets2.rowset.refreshControls()
      else
         msgbox( "There is nothing to edit!", "Can't do that!", 16 )
      endif

      return
In addition to these two buttons, we also need code for the "Delete" button.
   function PBDELETE_onClick
      if msgbox('Delete this pet?', 'Warning!', 4+32) == 6
         form.customerandpetsdatamodule1.pets2.rowset.delete()
      endif
      return
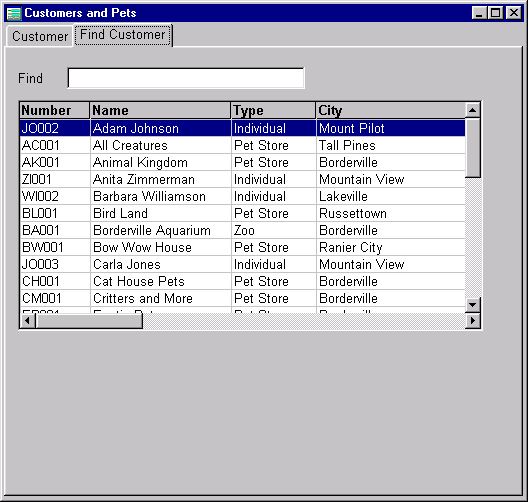
Figure 5.3 shows the form's second page. This page is inherited from the custom DataForm so the Seeker and grid controls are already contained in the form. The grid in this form is linked to the customer1 query. Remember that an index must be active for the form.rowset object in order for the seeker control to work. I used the "NAME" index from the Customer table. It was set in the datamodule.
The Pets dialog form is similar to the InvoiceEdit.wfm dialog form that you created in the Tutorial Project. The form contains a single query object linking the form to the Pets table. There is also a lookupSQL for the "Animal Type" field:
fields["Animal Type"].lookupSQL = "select * from animals"
You can create a new form, derived from DialogForm.cfm, and add these objects and properties.
Figure 5.4 is an illustration of the form with the user interface objects.
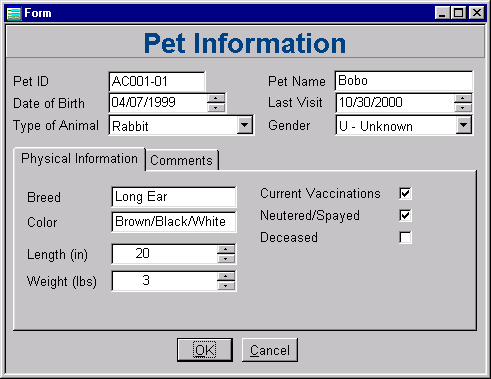
| Label Text | Control Class | Field/other |
| Pet ID | MyEntryField | pet number |
| Data of Birth | MySpinbox | date of birth |
| Type of Animal | MyComboBox | animal type * |
| Pet Name | MyEntryField | pet name |
| Last Visit | MySpinbox | last visit date |
| Gender | MyComboBox | gender** |
| On the Notebook control | ||
| Breed | MyEntryField | breed |
| Color | MyEntryField | color |
| Length | MySpinBox | length |
| Weight | MySpinBox | weight |
| Current Vaccinations | MyCheckBox | current vaccinations |
| Neutered/Spayed | MyCheckBox | neutered_spayed |
| Deceased | MyCheckBox | deceased |
| Comments | MyEditor | comments |
Notes:
|
||
The Pet Information form is designed to open in "Append" mode so that the user can add a new pet to the system, or in "Edit" mode so that the user can modify the pet information that is on file. This is handled in the dialog form's onOpen event.
   function form_onOpen
      local nKey
      if type( "form.Mode" ) == "C" // character
         if form.mode == "Append"
            form.rowset.beginAppend()
            // assign defaults
            form.rowset.fields["CustomerID"].value := form.customerID
            form.rowset.refreshControls()
         else
            nKey = this.petID
            // find current row
            form.rowset.canNavigate := {|| true }
            form.rowset.indexName   := 'PetID'
            form.rowset.findKey( nKey )
            form.rowset.canNavigate := {|| false }
            // start editing:
            form.rowset.beginEdit()
         endif

      endif
      return
The next form we will create for our Pet Clinic application is used to enter and edit visit information. The VisitEntry form is depicted in Figures 5.5 and 5.6.
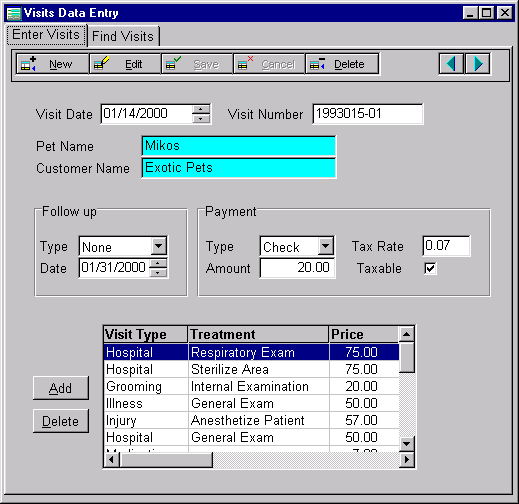
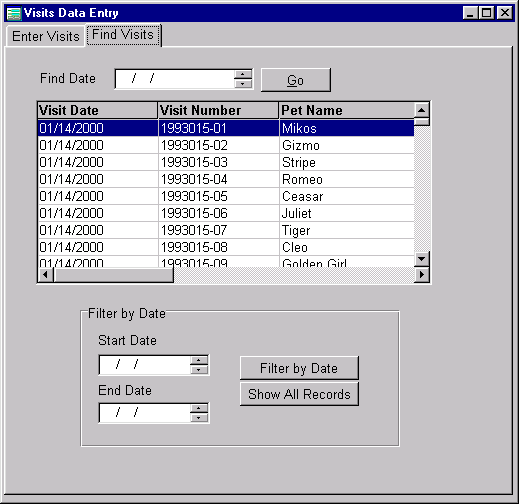
On page one of the form, we see that the visit date, visit number, pet name and customer name are displayed at the top of the form. Followup and payment information are also displayed on this form. The grid at the bottom of the page displays treatment details for the visit. These details are added with a dialog form.
On page two of the form, the user can find visits by their date. A user enters a date in the "Find Date" spinbox, and we will seek that date with the GO button. Alternatively, the user can enter a Start Date and End Date which will be used to set a filter.
To get a better understanding of this form let's consider its datamodule. In Session 3 we created the Visits.dmd datamodule. Open this datamodule in the dQuery designer; it will look similar to Figure 5.7.
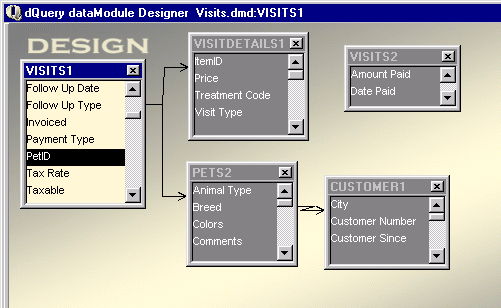
Notice that the Visits1 query object is the Master rowset for this datamodule. This query has two children, VisitDetails1 and Pets2. The bulk of the data entry work takes place in the Visits1 and VisitDetails1 queries. The Pets2 and Customer1 queries are used only for lookup and display purposes. For each visit, this form will lookup the Pet's name from the pets2 query and the Customer's name from the customer1 query.
This datamodule is an example of the how a parent-child relationship can be set in multiple ways. The Pets database is designed such that each pet can have multiple visits. Thus Pets and Visits are said to hold a one-to-many relationship. In dBASE we frequently build datamodules where a one-to-many relationship is expresses in a parent-child link. But, dBASE also lets us create a parent-child link between Visits (the parent) and Pets (the child). In this case each visit is linked to one, and only one, pet.
Create the Form
Begin by creating a new form in the form designer. The VisitEntry form is subclassed from the custom dataForm, so you will need to set the custom form class to Dataform.cfm.
Next drag the VisitEntry datamodule onto the form and add the various visual controls. The following table offers some guidance for the controls on page one. On page two you will need to add three mySpinbox controls, but these are not datalinked to any query objects. Also you will need to set the Seeker control's visible property to false because this control is inherited from the Custom DataForm and it cannot be deleted.
| Visit Date | MyEntryField | visits1."visit date" |
| Visit Number | MyEntryField | visits1."visit number" |
| Pet Name | MyDisabledEntryField | Pets2."pet name" |
| Customer | MyDisabledEntryField | customer1."name" |
| Type | MyCombobox | visits1."follow up type" 'array {"None","Exam","Physical","Shots"}' |
| Date | MyEntryField | visits1."follow up date" |
| Payment Type | MyCombobox | visits1."payment type" array {"Cash","Check","Charge"} |
| Amount Paid | MyEntryField | visits1."amount paid" |
| Tax Rate | MyEntryField | visits1."tax rate" |
| Taxable | MyCheckBox | visits1."taxable" |
| Visit Details Grid | MyGrid | form.visitsdatamodule1.visitdetails1.rowset |
Entering the Pet ID
When a new visit is added to our database, we need to be sure that the visit information is associated with the correct pet. Since the Master query object is Visits1, a PetID will not automatically be added to the Visits table.
To solve this problem we will use a popup form to select the correct pet, and then insert the PetID into the table. Figure 5.8 is a representation of the PetSelect popup form.
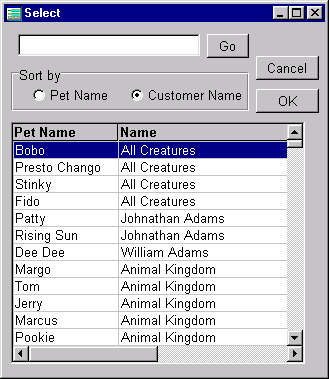
This form uses the SelectForm.dmd datamodule, which contains a Pets2 query object and a Customer1 query object. At the top of the form are an entryfield and a "Go" button. A user can enter a pet name and the Go button will seek the value. The following code can be used in the onClick event handler of this button.
   function PBGO_onClick
      this.form.rowset.findKeyNearest(UPPER(;
	         this.form.entryfield1.value.rightTrim()))
      return
The form is laid out so that a user can look for a pet by name or by owner. A user can change the index order of the data by using the two radiobuttons. When the "Pet Name" button is selected, we set the Pet Name index for the Pets2 query. When the "Customer Name" button is selected, we set the "Pet Number" index key. The Pet Number index will sort the data alphabetically by customer because the pet number is constructed from the customer's name.
Another feature of this form is that the background color of the grid columns will change when a sort order is selected. This is a useful visual aid for the user. The following code is used in the onChange event handlers of these two radiobuttons:
   function RBCustomer_onChange
      form.rowset.indexName := "Pet Number"
      form.rowset.first()
      form.grid1.columns["COLUMN2"].editorControl.colorNormal = ;
               "WindowText/white"

      form.grid1.columns["COLUMN1"].editorControl.colorNormal = ;
               "WindowText/0XC8D0D8"
      return

   function RBPet_onChange
      form.rowset.indexName := "pet name"
      form.rowset.first()
      form.grid1.columns["COLUMN1"].editorControl.colorNormal = ;
               "WindowText/white"

      form.grid1.columns["COLUMN2"].editorControl.colorNormal = ;
               "WindowText/0XC8D0D8"

      return
Finally we need to add the onClick event handlers for the Cancel and OK buttons. When a user clicks the Cancel button we will simply close the form. When the user clicks the OK button we will store the selected PetID in a custom form property. This property will be used by the parent form and tells that form which row the user has selected. Then we will close the form.
   function PBCancel_onClick
      form.close()
      return


   function PBOK_onClick
      form.PetID = form.rowset.fields['Petid'].value
      form.close()
      return
Calling the Select Form
Now that the Select form is ready to use, we need to return to the VisitEntry form and create some code to call this dialog form. Since we need to retrieve the correct PetID only when we are adding new visits, we want to call up the Pet Select form when a user clicks the "New" button. The user can then select the correct pet for the visit, click the OK button, and the pet's PetID will be stored in a form property. Our VisitEntry form can then retrieve that value.
The VisitEntry form's New button is derived from a custom class, so we will need to override the onClick event handler. Use the following code in this override method.
   function PBNEW_onClick
      set procedure to SelectForm.wfm additive
      local f, nID
      f = new SelectForm()
      f.mdi = false
      f.PetID = ""
      f.readModal()

      if not empty( f.PetID )
         nID = f.PetID
         form.rowset.beginAppend()
         form.rowset.fields['PetID'].value = nID
         form.mynotebook1.mytoolbar1.setButtons()
         form.rowset.refreshControls()
      endif
      close procedure SelectForm.wfm
      return
This code will open the Pet Select form and retrieve the selected PetID. For a detailed explanation of this code see the Tutorial add-on Form Talk.
You should now be able to test this button.
A Display Problem
The Pet name and Customer name EntryFields on the Visits Entry form are data linked to fields in the Pets and Customer tables. But, while a new Visit record is being added, the data is not yet saved to the tables. The PetID is in the row buffer but it has not been saved to the table. Therefore, the Pet name and Customer name do not appear while the user is adding data.
Many users will find this a bit disconcerting. So we have some work to do. We will add two more MyDisabledEntryFields to the form. These fields will not be datalinked but they will display the pet name and the customer name while the visit data is being added. Place these entryfields directly on top of the two current disabledEntryFields. Our form will toggle the visible property of these two EnteryFields, and the two datalinked enteryFields, based on the rowset's state.
To accomplish these goals, we will need a stand alone method in the VisitEntry form which toggles the disabledEntryFields. The following code can be added to the form. In my form, EFPetName1 and EFCustName1 are the disabledEntryFields that are datalinked to the tables, while EFPetName2 and EFCustName2 are not datalinked.
   function ToggleEF
      local bAppend
      // if the rowset state is 3 (append), bAppend is true
      // otherwise bAppend is false.
      bAppend = form.rowset.state == 3

      form.MYNOTEBOOK1.EFPetName1.visible =  not bAppend
      form.MYNOTEBOOK1.EFCustName1.visible = not bAppend
      form.MYNOTEBOOK1.EFPetName2.visible =  bAppend
      form.MYNOTEBOOK1.EFCustName2.visible = bAppend
      return
Now we need to modify the PBNew onClick event code. The new code is highlighted in the following method.
   function PBNEW_onClick
      set procedure to SelectForm.wfm additive
      local f, nID
      nID = form.rowset.fields['PetID'].value
      f = new SelectForm()
      f.mdi = false
      f.PetID = ""
      f.readModal()

      if not empty( f.PetID )
         nID = f.PetID
         form.rowset.beginAppend()
         form.rowset.fields['PetID'].value = nID

         form.toggleEF()
         form.MYNOTEBOOK1.EFPetName2.value = ;
              f.selectdatamodule1.pets2.rowset.fields["pet name"].value
         form.MYNOTEBOOK1.EFCustName2.value = ;
              f.selectdatamodule1.customer1.rowset.fields["name"].value

         form.mynotebook1.mytoolbar1.setButtons()
         form.rowset.refreshControls()
      endif
      close procedure SelectForm.wfm
      return
After we append the petID to the row buffer, we toggle the entryfields. That will make the two non-datalinked fields visible, and the other two entryfields invisible. Then we set the value properties of the two visible entryfields with the pet name and customer name. Notice that these values are retrieved from the datamodule in the PetSelect form. This way the user can see the pet's name and the customer's name while the visit data is entered.
When the user saves or abandons the changes, the entryFields will need to be toggled back. Thus we need to override the onClick event handlers for the PBSave and PBCancel buttons. In addition, if the user navigates to another record we will need to toggle the entryFields. The code for these event handlers follows.
   function PBSAVE_onClick
      myToolBar::pbsave_onClick()
      form.toggleEF()
      return


   function PBCANCEL_onClick
      myToolBar::pbcancel_onClick()
      form.toggleEF()
      return


   function form_onNavigate(nWorkArea)
      form.toggleEF()
      form.mynotebook1.mytoolbar1.setButtons()
      return
The VisitDetail Dialog Form
Next we need to create a dialog form for entering the VisitDetails. In the VisitEntry form, the user can add treatment details to a visit or can delete the treatment details. There is no capacity to edit the visit details. If a user makes a mistake, they are trained to delete the erroneous item and add correct information.
Figure 5.9 is a representation of the VisitDetails form. This form contains a single query object for the VisitDetails table. The option buttons are datalinked to the "Visit Type" field in the VisitDetails table.
The Treatment ComboBox is datalinked to the "Treatment Code" field. In addition this field has a lookupSQL property linked to the Treatments table. For the lookupSQL we will select the Treatment Code, Treatment description and the Treatment Price from the table.
select * from treatments order by treatment
Finally, the Price SpinBox is datalinked to the Price field.

One thing that we will do in this form is to automatically insert a price in the PriceSpinBox. When a user selects a treatment in the Treatment ComboBox, the row pointer for the lookup rowset is at the price in the lookup table. The price is the third field in that table and can therefore be accessed in our code.
Create an onChange event handler for the combobox and add the following code. (The first two lines are a bug workaround.)
   function MYCOMBOBOX1_onChange
      // a workaround to force the onChange
      form.NOBUTTON.setFocus()
      this.setfocus()

      form.MySpinbox1.value =  ;
      form.visitdetails1.rowset.fields["treatment code"].;
               lookuprowset.fields[3].value
      return
Calling the VisitDetails form uses the same coding as we used for calling dialog forms in the Tutorial application or in the CustomerAndPets form. The following code is used for the Add pushbutton.
    function MYPUSHBUTTON1_onClick
      // Add VisitDetail
      if form.rowset.state = 2 or form.rowset.state = 3
         msgbox("Save visit information before adding details","Warning",48)
      else
         local f
         set procedure to VisitDetails.wfm additive
         f = new VisitDetailsForm()
         f.VisitID = form.rowset.fields['VisitID'].value
         f.mdi = false
         f.mode = "Append"
         f.readModal()

         close procedure VisitDetails.wfm
         form.visitsDatamodule1.VisitDetails1.rowset.last()
         form.visitsDatamodule1.VisitDetails1.rowset.refreshControls()
      endif
      return
The onOpen event handler for the VisitDetail form follows:
   function form_onOpen
      if type( "form.Mode" ) == "C" // character
         if form.mode = "Append"
            this.rowset.beginAppend()
            form.rowset.fields["VisitID"].value := form.visitID
         endif
      endif
      return
Finally we need code for the delete button on the VisitEntry form:
   function MYPUSHBUTTON2_onClick
      // Delete VisitDetail
      if msgbox('Delete this Visit Item?', 'Warning!', 4+32) == 6
         form.VisitEntryDatamodule1.VisitDetails1.rowset.delete()
      endif
      return
The Filters
Page two of the VisitEntry form is used to locate visits. The spinbox at the top of the form lets the user find a specific date while the other two spinboxes let the user set a filter on a range of dates.
First lets consider the spinbox at the top of the page. The user must enter a date and then click the "Go" button. The onClick event handler for this button is a simple method. The form is indexed by visit date, so we use the rowset findKeyNearet() method to find the desired date.
   function PBFINDDATE_onClick
      local dFilterDate
      dFilterDate = form.mynotebook1.sbFindDate.value
      form.rowset.findKeyNearest(dFilterDate)
      return
Next, we will consider the filtering controls. The user must enter a start date and end date, and then click the set filter button. As we noted above, this form is indexed by visit date, which means we could use the rowset setRange() method. However, it is useful for the beginner to see how a filter is set, particularly when a date range is involved. For this reason I am using the filter property rather than the setRange() method.
Here is the code for the Set Filter button.
   function PBFILTER_onClick
      local cEndDate, cStartDate, cFilter
      cStartDate = dtoc(form.mynotebook1.sbStartDate.value)
      cEndDate   = dtoc(form.mynotebook1.sbEndDate.value)
      cFilter    = [:Visit Date: >='] + cStartDate ;
                 + [' and  :Visit Date: <='] + cEndDate + [']
      form.rowset.filter := cFilter
      return
The rowset filter property must be an SQL expression, and SQL is a bit picky with respect to the "greater than or equal to" and "less than or equal to" operators: ">=" is acceptable, but "=>" is not.
In this form we are using a second button to clear the filter. You can, however, use one button to both set and clear a filter. (If you are interested in such an option, see "Creating a Simple Data Form in dB2K" in the dBASE KnowledgeBase.) Be that as it may, here is the code for our Clear Filter button.
  function PBREMOVEFILTER_onClick
      form.rowset.filter := ""
      return
There is one more thing that we need to do. If a filter is set in a form and the user adds a new record, that record may not be visible. Therefore, it would be a good idea to remove any filters before a record is appended. The following code should be added to the PBNew_onClick event. This should be placed before loading the SelectForm.
   function PBNEW_onClick
      //  If a filter is on, release it.
      if form.rowset.state == 4
         form.rowset.filter := ""
      endif

      set procedure to SelectForm.wfm additive
      local f, nID
      nID = form.rowset.fields['PetID'].value
      f = new SelectForm()
      f.mdi = false
      f.PetID = ""
      f.readModal()
You should save and test the form.
The VisitEntry form offers some interesting features that are not used in the Tutorial application. First, we developed a form where the master rowset is defined for a table that is the many side of a one-to-many relationship. The dBASE data objects are flexible and permit such "reverse relationship."
In the form, however, the "reverse relationship" created a problem with respect to linking the "many table" (Visits.dbf) with the "one table" (Pets.dbf) when a new record is added. We addressed this problem by using a popup form so that the user could select the parent key value.
Use of a popup form also gave us the opportunity look at how a child form can communicate with a parent form. In the Tutorial application (and in the CustomerAndPet form), we saw how a parent can set a custom property in a child form. And that the child form could then use that property as needed. Sometimes people say that the parent form passed information to the child form. But nothing was really passed.
The VisitEntry and PetSelect forms gave us the opportunity to see how a parent form can read a property that is within the child form. One might think of this as a return value, although nothing was actually returned.
Finally, the VisitEntry form gave us the opportunity to see how a filter might be set in a form. Although there is not just one way to set a filter, the technique used here made sense in the context of this form.
There is one last form that we need before concluding our discussion of the Pet Clinic application's forms. The Visits Information form is presented in Figure 5.10. This is a dialog form that is called from the CustomerAndPets Form. It provides the user a way to lookup and, if necessary, edit visit information for a specified customer.
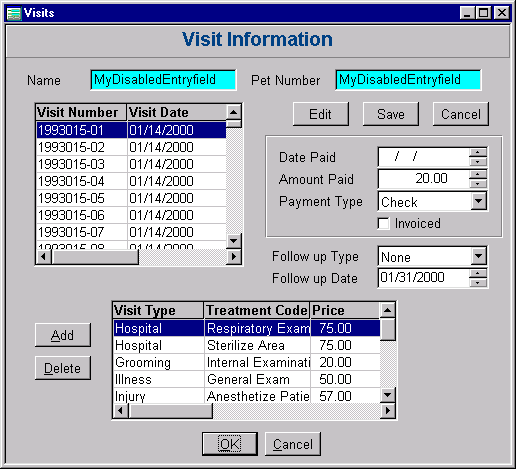
The datamodule that we used in this form is Visits.dmd, the same datamodule that we used in the Visit Entry form.
The Visit Dialog form is subclassed from the custom DialogForm. It is called from the CustomerAndPets form and the petID is set as a custom form property. In the form's onOpen event we use the rowset setRenge method to restrict the visits to the selected petID. The Visit Dialog form will then display in a grid all the visits for the selected pet. The user can now edit the visit information and add or delete visit details. (We are reusing the VisitDetail dialog form.)
Use the following table to help place the various objects on the form. The Visits Dialog contains the following form objects.
| Pet Number | MyDisabledEntryField | pet number |
| Name | MyDisabledEntryField | pet name |
| Visits Grid | MyGrid | form.visitsdatamodule1.visits1.rowset |
| Date Paid | MySpinBox | date paid |
| Amount Paid | MyEntryField | amount paid |
| Payment Type | MyEntryField | payment type |
| Invoiced | MyCheckBox | invoiced |
| Type | MyCombobox | follow up type |
| Date | MySpinBox | follow up date |
| Visit Details Grid | MyGrid | form.visitsdatamodule1.visitdetails1.rowset |
When the Visit Dialog form opens, we filter the visits with the setRange method. We also set the values for the Pet Name and Pet Number EntryFields. These entryFields are not dataLinked as the Pets table is not contained in the datamodule.
   function form_onOpen
      local nKey
      if type('this.petID') # 'U'
         nKey = this.petID
         this.rowset.indexName := 'PetID'
         this.rowset.setRange(nKey)
         this.myEntryField1.value = this.name
         this.myEntryField2.value = this.PetNumber
      endif
      return
Next we need to add code for three onClick event handlers. The user is given the option to Edit the selected visit. If the rowset is placed in edit mode, the user will need the option to save or abandon the changes. The event handler code for these pushbuttons follows.
   function MYPUSHBUTTON3_onClick
      // Edit a Visit
      form.rowset.beginEdit()
      return

   function MYPUSHBUTTON4_onClick
      // Save Visit updates
	  form.rowset.save()
      return

   function MYPUSHBUTTON5_onClick
      // Abandon Visit updates
      if msgbox( "Abandon changes to this row?","Abandon changes?", 36 ) == 6
         form.rowset.abandon()
      endif
      return
Finally, we will provide the user with the ability to add or delete visit details. This is substantially the same procedure that was available in the VisitEntry form. To add visit details we use the VisitDetails dialog form and the add button calls the form. To delete a visit detail we call the rowset delete method. The following code is used for these two onClick event handlers.
   function MYPUSHBUTTON1_onClick
      // Add VisitDetail
      local f
      set procedure to VisitDetails.wfm additive
      f = new VisitDetailsForm()
      f.VisitID = form.VisitsDatamodule1.visits1.rowset.fields['VisitID'].value
      f.mdi = false
      f.mode = "Append"
      f.readModal()

      close procedure VisitDetails.wfm
      form.VisitsDatamodule1.VisitDetails1.rowset.last()
      form.VisitsDatamodule1.VisitDetails1.rowset.refreshControls()
      return

   function MYPUSHBUTTON2_onClick
      // Delete VisitDetail
      if msgbox('Delete this Visit Item?', 'Warning!', 4+32) == 6
         form.VisitsDatamodule1.VisitDetails1.rowset.delete()
      endif
      return
The Visit Dialog form is called from the CustomerAndPets forms. We are going to use the double click event in the grid to call up the form. A user will select a specific pet in the grid and if they double click, the visits dialog form will appear. The following code is used to call the VistDialog form.
   function MYGRID2_onLeftDblClick(flags, col, row)
      local f
      set procedure to visitsDialog.wfm  additive
      f = new visitsForm()
      f.PetID = form.customerandpetsdatamodule1.pets2.rowset.fields['PetID'].value
      f.name = form.customerandpetsdatamodule1.pets2.rowset.fields['Pet name'].value
      f.petNumber = form.customerandpetsdatamodule1.pets2.rowset.fields['Pet number'].value
      f.mdi = false
      f.readModal()
      close procedure visitsDialog.wfm

      return
The Legal Stuff: This document is part of the dBASE onLine Training Program created by Michael J. Nuwer. This material is copyright © 2001-2002, by Michael J. Nuwer. dBASE, dBASE Plus, dBASE SE and dB2K are copyrighted, trademarked, etc., by dBASE, Inc., the BDE (Borland Database Engine) and BDE Administrator are copyrighted, trademarked and all that by Borland Software. This document may not be posted elsewhere without the explicit permission of the author, who retains all rights to the document.