
Developing a Database Application:
Tutorial Add-On
Michael Nuwer
October 24, 2001
|
Developing a Database Application:
|
|
More on Custom Classes |
The goals for Add-on III are:
In this Appendix we are going to create a custom class that will enhance the functionality of our application. You will recall that in Phase IV of the Tutorial we created some custom classes. Those classes were based on the standard controls built into dBASE Plus. For the most part, we modified various properties so that the controls were customized to our needs.
The custom class that we will create in this Appendix, is going to be a control that adds functionality to one of the dBASE Plus built-in controls. It will behave in ways that are not currently available with any of dBASE Plus's built in controls.
The main goal of this Appendix is to create, from scratch, our own custom class. There are many possible classes that we could create. We could, for example, create a mover class. This is a common component in Windows application. With it, a user can select items from one listbox and move them to another listbox. Or, we could create a calendar class. This might work with an entryfield where a small pushbutton calls the calendar and the user's selection is returned to the entryfield. Yet another possible custom class might combine an entryfield and a grid to create a control which offers a multi-column combobox.
I have chosen to create a custom class that will simulate the the listbox control found in Visual Basic. I know many of you don't want anything to do with Visual Basic, but please don't through your shoe at me quit yet. If you find the name VBListbox too difficult to type, please use another name like ItemListbox or ArrayListbox.
The reason that I have chosen this particular class is that it will give you the opportunity to learn all the basic elements needed to create a custom class in dBASE Plus; it will offer new functionality to an existing control; and, at the same time, it is a rather simple class to create. Adding functionality to a standard control can require many lines of code, and to make the control truly generic, can require many conditional checks. But this Appendix is not intended to teach you how to write code. Rather, it's goal is to help you learn how to create a custom class. Using simple code has the benefit that we are not distracted from the main goal.
In addition to the above, the VBListbox will provide us the opportunity to introduce the dBASE Plus Listbox control and the dBASE Plus array object. Neither of these classes are used in the main Tutorial Project, however, both are very much worth learning.
An array is a data structure in the computer's memory that uses one name to reference multiple memory locations. Arrays are particularly useful for storing values that must be processed more than once by a program. Each position of an array is numbered starting at one. To use an array, your program must reference the individual location by using both the name of the array and the position number. This position number is usually called a subscript or index.
A listbox is used frequently in Windows applications because they can show a long list of items. A listbox is also a good control to use when the user needs to select one or more items from a predefined list. Selecting from a list of predefined values eliminates the possibility of typing errors.
A listbox control provides a list of items from which the user can make a selection. The dBASE Plus listbox is quite useful. It can be used to list the contents of an array, the contents of a field in a table, a list of files from your hard drive, or a list of all the fields in a rowset. The listbox control opens numerous possibilities.
Processing the user's selection is not part of the listbox control. The developer must determine which item is selected and then process the data by working with the array, or the rowset, or the file on the hard drive. This is were our new control will add functionality. We will create a new listbox class that adds data processing methods and thereby create an enhanced listbox control.
The final reason for creating a custom class that simulates the Visual Basic listbox is that you might be a Visual Basic user. In that case, this class will look and feel more comfortable. dBASE Plus is a very powerful development tool.
Okay, so what is a class. It would be a good idea to clearly define some of the concepts used in Object Oriented Programing. A class is a definition of an object. As Alan Katz states, "a class is not executable code. It is a blueprint only. Just like a real blueprint, you can't live in the house represented by the blueprint until you build it." (See "oop.how" in the dBASE Knowledgebase. The next few paragraphs rely on this document.)
Every class has two main elements: Properties and Methods. Properties are used to store information and define the object's characteristics. Methods are used to define the behavior of an object. They are the functions that belong to the object. Taken together, the class properties and their values are the constructor code of the class. The constructor does not include the class methods.
dBASE Plus includes many standard classes. These are built-in definitions from which you can create instances of the class. When you create an instance of the class, you make an object from the class definition. Instances are the objects that the user actually see and use.
dBASE Plus also allows you to create custom classes. A custom class can be created from a standard class, from another custom class, or from scratch. If it is created from another class, the custom class is said to be subclassed (or derived) from that object. In that case, the custom class will inherit the properties and behaviors from the parent or superclass.
The listbox class that we are going to create is a custom class that is subclassed from the standard dBASE Plus listbox. To create this class we must begin with a class declaration statement. In dBASE Plus, open a new file in the Source Code Editor and enter the following lines:
   class VBLISTBOX(parentObj) of LISTBOX(parentObj) custom

   endclass
Save this file in the Tutorial's myCustom folder as VBListbox.cc (or whatever other name you would like).
Our new listbox class does not, at this point, contain any custom properties or methods. If it were instanced as-is, it would produce an exact replica of the standard listbox class with all the same default properties.
Since we want to customize our new class, we are going to add some new properties and methods. First we will override some of the listbox's built-in properties. For example, the default height of a listbox is 4 and it's default width is 8. We will override these values and set the height of the VBListbox to 6 and its width to 16. Add the following to our class.
   class VBLISTBOX(parentObj) of LISTBOX(parentObj) custom
      this.height  := 6
      this.width   := 16
   endclass
Next we will add a custom property. This is a property of the class which is not contained in the superclass. To define a custom property we merely need to declare it. For our custom listbox, the custom property that we want to add is an array named "aListItems." In your class, add the next two lines; the ones in bold type below.
   class VBLISTBOX(parentObj) of LISTBOX(parentObj) custom
      this.height  := 6
      this.width   := 16
      this.aListItems = new Array()
      this.dataSource = "ARRAY this.aListItems"
   endclass
aListItems is the new custom property. It is a member of the VBListbox class, so "this.aListItems" declares the custom property as a member of the current class. The aListItems property is then declared as a new array object.
The next line is used to assign the aListItems array to the dataSource property of the VBListbox. This way our new listbox class will have a permanent dataSource. We will use this when we create the class's methods.
There is one more custom property that we will add to this class. It is called "autoSort." The value of this property is true or false, and it will be used when we create the methods for this class. Add this.autoSort = false after the dataSource property.
Now we are ready to add the custom methods to our class. We need methods for adding and removing items from the listbox. To do this, the custom methods will add or delete elements from the aListItems array and then restate the dataSource.
The AddItem Method. To add an item to a list box we will use the AddItem method. We will pass a string value to this method which contains the item this is to be added.
This method needs to add the string element to the aListItems array and then restate the listbox's dataSource. The following code achieves these two tasks. Type the following into the class.
   function AddItem(cItem)
      this.aListItems.add(cItem)
      this.dataSource += ""
      return
We also need to check the autoSort property, and, if it's true, we need to re-sort the array. So modify the above code with the following:
      this.aListItems.add(cItem)
      if this.autoSort
         this.aListItems.sort()
      endif
      this.dataSource += ""
The RemoveItem Method. To remove an item from our listbox we need to delete the item from the array, resize the array, re-sort the array (if needed), and then restate the listbox's dataSource. To delete an item in an array, we must specify the number of the element to delete. This number must be passed to the method as nIndex. The following code should be added to our class.
   function RemoveItem(nIndex)
      this.aListItems.delete( nIndex )
      this.aListItems.size := this.aListItems.size - 1
      if this.autoSort
         this.aListItems.sort()
      endif
      this.dataSource += ""
      return
The Clear Method. The next method that we will add is used to empty the listbox. This method is similar to the RemoveItem method except, rather than deleting a single item, we will delete all the items. This can be done with a "for...endfor" loop. Add the following code to the VBListbox class.
   function Clear
      local nElements
      for nElements = 1 to this.aListItems.size
         this.aListItems.delete( nElements )
      endfor
      this.aListItems.size := 0
      this.dataSource += ""
      return
The ListCount Method. The ListCount method is used to determine the number of items in a listbox. This method returns a number which the developer can store as a variable. Add the following code to our class.
   function ListCount

      return this.aListItems.count()
The ListIndex Method. When a program uses our listbox, we will need to know which item in the list is selected by the user. We will do this by determining the index number of the selected item. The method can also be used to programmatically change the selected items. If no element number is passed to the method, the currently selected element number is returned (ListIndex). Otherwise, the current selection is changed to the index number passed to this method.
   function ListIndex(nIndex)
      local nRetVal
      if empty(nIndex)
         nRetVal = this.curSel
      else
         this.curSel = nIndex
         nRetVal = nIndex
      endif
      return nRetVal
The List Method. The List method is used to when we need to display an item from the list. This method returns the text of the item associated with the index number passed to the method or of the currently selected item if no parameter is passed.
   function List(nIndex)
      local cRetVal
      if empty(nIndex)
         cRetVal = this.value
      else
         cRetVal = this.aListItems[nIndex]
      endif
      return cRetVal
Great! We're now done developing this class. We have created an object that is derived from the standard listbox and thereby contains all the functionality of that control. We then added a custom property (aListItems) and defined it as an array. This array is tied to the listbox's dataSource property. Thus any time an instance of this custom listbox is created, it's dataSource will be the aListItems array.
We also added six methods to this class. Each of them manipulates data contained in the array. We can add and remove items from the listbox with methods that add and remove items from the object's internal array. The other methods work in a similar manner. Thus the user of this listbox does not need to manipulate the array, but rather needs only to call the appropriate method. dBASE Plus is really cool stuff!
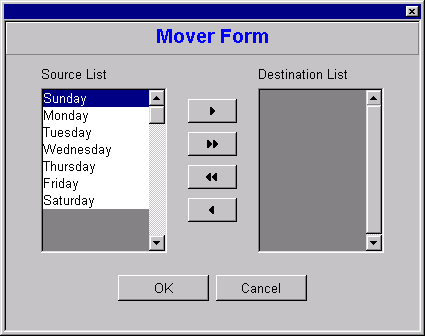
In order to get the clearest understanding of the custom class that we have just completed, it is a good idea to use the class in a form. I propose that we create a form that operates like a mover object. Figure AIII.1 is a representation of the form we will create. The code for this form is loosely based on Dan Howard's ItemMover class.
To begin we need to add our class to the Component palette. I suggested that you save the CC file in the myCustom folder. Use the Navigator to change to that folder (or to whatever folder you saved the class in) and double click VBListbox.cc.
Next change back to the main tutorial folder and open a new standard form in the designer. The from is going to be a dialog form, so set dialogForm.cfm as the custom form.
Now we can add the new controls. The form should have two VBListbox controls, two textLabels and four pushbuttons. See Figure 1 for the relative placement of the controls.
Finally we need to modify some of the pushbuttons' properties. The following Table shows the properties needed for each of the four pushbuttons.
| name = PBADD
text = "" upBitmap = "RESOURCE #854" |
|
| name = PBADDALL
text = "" upBitmap = "RESOURCE #855" |
|
| name = PBREMOVEALL
text = "" upBitmap = "RESOURCE #852" |
|
| name = PBREMOVE
text = "" upBitmap = "RESOURCE #853" |
By now you should be getting good at creating forms. The next thing we need to do is to add some methods to this form. The first method that we need is an onOpen event handler which will populate the Source List with some information. We will do this with the VBListbox's AddItem method. Add the following onOpen event to the form:
   function form_onOpen
      this.vblistbox1.additem("Sunday")
      this.vblistbox1.additem("Monday")
      this.vblistbox1.additem("Tuesday")
      this.vblistbox1.additem("Wednesday")
      this.vblistbox1.additem("Thursday")
      this.vblistbox1.additem("Friday")
      this.vblistbox1.additem("Saturday")
      return
Next we will need four onClick events, one for each of the mover buttons.
When a user clicks the add button we need to "move" the selected item from the Source List to the Destination List. To do this we will remove the item in the left listbox and add it to the right listbox. Add the following method to the form.
   function PBADD_onClick
      local nIndex
      nIndex = form.vbListBox1.ListIndex()
      form.vblistbox2.additem( form.vbListbox1.List(nIndex) )
      form.vbListBox1.RemoveItem( nIndex )
      return
The add all button is used to move all the item in the Source List to the Destination List. Our code will use a for...endfor loop to add each item in VBListbox1 to VBListbox2, then we will clear VBListbox1 of all items. Add the following to the onClick event for the addAll pushbutton.
   function PBADDALL_onClick
      local nIndex
      for nIndex = 1 to form.vbListBox1.count()
         form.vblistbox2.additem(form.vbListbox1.List(nIndex))
      endfor
      form.vblistbox1.clear()
      return
The other two pushbuttons do the same thing as the first two button, except the items move in the opposite direction. The following two onClick methods should be added to the form.
   function PBREMOVE_onClick
      local nIndex
      nIndex = form.vbListBox2.ListIndex()
      form.vblistbox1.additem( form.vbListbox2.List(nIndex) )
      form.vbListBox2.RemoveItem( form.vbListBox2.ListIndex() )
      return

   function PBREMOVEALL_onClick
      local nIndex
      for nIndex = 1 to form.vbListBox2.count()
         form.vblistbox1.additem(form.vbListbox2.List(nIndex))
      endfor
      form.vblistbox2.clear()
      return
There is one more thing we need to do with this form. Normally mover controls allow the user to double click an item as an alternative way to move items from one list to another. So we should add left doubleClick events for both of the VBListboxes. The following events can be added to the form.
   function VBLISTBOX1_onLeftDblClick(flags, col, row)
      this.parent.PBAdd_OnClick()
      return

   function VBLISTBOX2_onLeftDblClick(flags, col, row)
      this.parent.PBRemove_OnClick()
      return
Now you can save and test your form.
You should be able to use each of the four mover buttons. You can add a single item or all the items in the Source List to the Destination List. And you can remove a single item or all the items in the Destination List. In addition you should be able to add or remove individual item by double clicking them.
In addition to the above methods of moving items between the listboxes, we can give the user drag and drop capabilities to accomplish the same results. The dBASE Plus listbox is one of the user interface object that is a "Drop Target." This means that other objects can be dropped onto the listbox object.
First we will enable drag-and-drop from the Source List to the Destination List.
Be sure the MoverForm is open in the designer and select VBListbox1. In the Inspector, change the dragEffect property to 1-copy.
Next add an onLeftMouseDown event handler for VBListbox1 with the following code:
this.drag(this.name,this.value,"")
This code calls the built-in drag method which initiates the drag and drop procedure.
Now we need to modify VBListbox2. Set it's allowDrop property to true. Then add an onDrop event with the following code:
      local nIndex
      nIndex = this.parent.vbListBox1.ListIndex()
      this.additem( cName )
      this.parent.vbListBox1.RemoveItem( nIndex )
This code is a slight modification of the PBADD_onClick event code.
Save the form, and test it.
So far, the user can drag an item from the Source List and drop it into the Destination List. You should also permit the user to remove items in the Destination List with drag and drop procedures. To do this, simply apply the same steps as above, but work from the VBListbox2 (the Destination List) to VBListbox1 (the Source List).
More information is avaialbe in the dBASE Knowledgebase. See "Drag and Drop 101" by Tim Converse.
One last thing before we conclude this Appendix. Earlier when you double clicked the VBListbox.cc file, you registered that file as component for dBASE Plus. Unless you remove the registration, the file will load automatically each time dBASE Plus loads. Use the Navigator and open a new form. Right click on the Component Palette. Select "Set Up Custom Components" from the popup menu. You should see the file VBListbox.cc in the list of custom components. Select it and click the Delete button. Now VBListbox.cc will not load the next time you run dBASE Plus.
In this Appendix we have created a Custom Class which modifies the behavior of the dBASE Plus Listbox object. We have built into our Custom Listbox an array which will hold the list displayed in the list box. We then added a set of methods to our new class. These methods handle adding and removing data from the array, and thereby automate adding and removing data from the listbox.
Once completed this new class can be reused on any form you would like. But it is not the reusability that is the most beneficial aspect of creating and using custom classes. The prime benefit of creating objects is that you will never need to debug this code again. Once a custom class is created and fully tested, it is a self-contained object. It is like a "black box" which does it's job, but never needs to be opened.
The Legal Stuff: This document is part of the dBASE online training
created by Michael Nuwer. This material is copyright © 2001, 2002 by Michael
Nuwer. dB2K, dBASE, dBASE Plus, and dBASE SE are copyrighted, trademarked, etc.,
by dBASE, Inc., the BDE (Borland Database Engine) and BDE Administrator are
copyrighted, trademarked and all that by Borland, International. This document
may not be posted elsewhere without the explicit permission of the author, who
retains all rights to the document.